 Comp 101
Connect Carolina 2.0 - Walk
Comp 101
Connect Carolina 2.0 - Walk
Connect Carolina 2.0 -- Intro
In this three part problem set, you will work up to making your own faster Connect Carolina! Each part will build off of the previous part.
Here is an overview of what you will do in each part:
1. (Walk 30 pts) Create a Course class and functions to help build and print courses.
2. (Jog 30 pts) Create a Schedule class and functions to add courses to a schedule and print a schedule.
3. (Sprint 40 pts) Import data from a CSV of all the classes at UNC as an array of Courses. Help the user choose their perfect schedule by writing functions that filter this array by course departments, numbers, and geneds.
Part 0. Starting the Dev Environment
As with in lecture, begin by opening up VSCode, ensuring your project is still open, and then running the following two commands in the VSCode Integrated Terminal:
- npm run pull
- npm start
Part 1. Setting up an App
In the same directory used in lecture:
- Right click on the ps07-connect-carolina folder
- Select "New File"
- Name the new file: walk-app.ts
- Note: capitalization and punctuation are important!
Part 2. Starting your Code
2.0 Honor Code Header
All problem sets begin with an Honor Code pledge. Notice this header is contained within block comment tags discussed in Lecture 1. You can copy paste the pledge below and fill in your name and ONYEN.
/*
*
* Author:
*
* ONYEN:
*
* UNC Honor Pledge: I certify that no unauthorized assistance has been received
* or given in the completion of this work. I certify that I understand and
* could now rewrite on my own, without assistance from course staff,
* the problem set code I am submitting.
*/
2.1 Imports
The next step after ensuring the honor code header is to import the functions we'll use from the introcs library. The first lines of code to add to your app is the following:
import { print } from "introcs";
2.2 The main Function
Your program's execution will begin in a special function named `main`. This is the first problem set that not all of your code will be in main. You will create your functions outside main and call them from inside main. All your code will run once main is called (main();).
export let main = async () => {
// TODO: Put SOME code here
};
// TODO: Put your EXPORTED functions here
main();
Part 3: Making Courses -- Walk
In this part of the problem set you will create a Course class and functions to help build and print courses.
Through writing this program you will:
- Gain experience defining a class to represent a composite data type
- Write a constructor with multiple parameters
- Gain experience creating objects (instances of a class)
- Write a function that returns a string representation of an object
Part 3.1 Define and Export a Course class
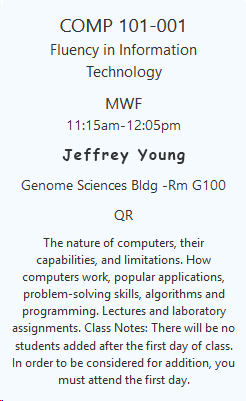
What properties should be a part of a Course class? Well, when you click on a course in Coursicle, the information in the image above is displayed. To Coursicle, a course consists of a department abbreviation (COMP), number (101), title (Fluency in Information Technology), days of the week (MWF), time, professor, building, geneds, and description! That is a lot of information in one class! Let us be humbled by Coursicle and just choose our four favorite properties of the ones it uses, namely department code, number, geneds, and description.
Above main, define a class called Course with the following four properties
- a string called department initialized as an empty string
- a number called num initialized to 0
- an array of strings called geneds initialized to an empty array
- a string called description initialized to an empty string
Be sure that you add the export keyword to your class definition so that the grader can assess your work.
If you need help remembering the syntax for constructing a class, check out this page from the 101 Topics Pages.
Part 3.2 Define a constructor for your Course class.
Declare a constructor inside of the Course class body that has four parameters: a department (string), course number (number), array of geneds (string array), and description (string) in this order. Inside of the constructor, you should initialize each of the Course property using the corresponding parameter.
Test this function in main by creating a new variable of type Course and initializing it by calling the constructor with arguments of your choosing. To test that it was properly constructed, print each property of the new Course object. Here is an example of an abbreviated test case. You should extend this to check the other properties.
let comp101: Course = new Course("COMP", 101, ["QR"], "A cool class");
print(comp101.department); // output should be COMP
Part 3.3 Define and export the courseToString function
Once you know your constructor works, you are ready to print Course objects. Unfortunately, you cannot simply say print(comp101) because your computer does not know how to print a Course object. You need to create a function that converts your Course object into a human readable string, which your computer can print.
Declare and export a function called courseToString which will take in the Course to be converted to a string. The function should return a string that contains the Course parameter's department, num, and description properties -- you do not need to include the geneds.
Now, you should test your function in main. Print the string returned from the courseToString function. If the argument was the comp101 object created in the previous test, the output would be something like:
COMP 101: A cool class
Congrats! You're done with Walk!
Part 3.4: Publish your app.
With your program running in your web browser, find the green "Publish App" button. If you are not still logged into introcs.com, you will be prompted to log in, and then your app will be bundled and published to the web!
Part 3.5: Submit for grading
Once the grader is available, to submit for grading, first publish your project as per Part 3.4. Then, go to My101 in the top-right right corner of this page and select "Submit" next to the assignment. From here you should see a button that allows you to submit for grading. Your work will be graded through an automated process. If you receive points off, please select the "Report" link to see which tests did not pass. You can resubmit as many times as you'd like without penalty up until the deadline. We want you to keep working toward full credit on problem sets!
Now you are ready to make schedules in Jog!